In summary:
- Learn to identify the red layers (ancient soil) between black basalt flows to understand the timeline of eruptions.
- Recognize the different ways the ocean sculpts cliffs, from the power of compressed air to the slow grind of abrasion.
- Understand why specific geological features, like high ledges or hexagonal columns, are crucial for both wildlife and safety.
- Use your geological knowledge to improve your paddling, finding shelter from wind and capturing stunning photos.
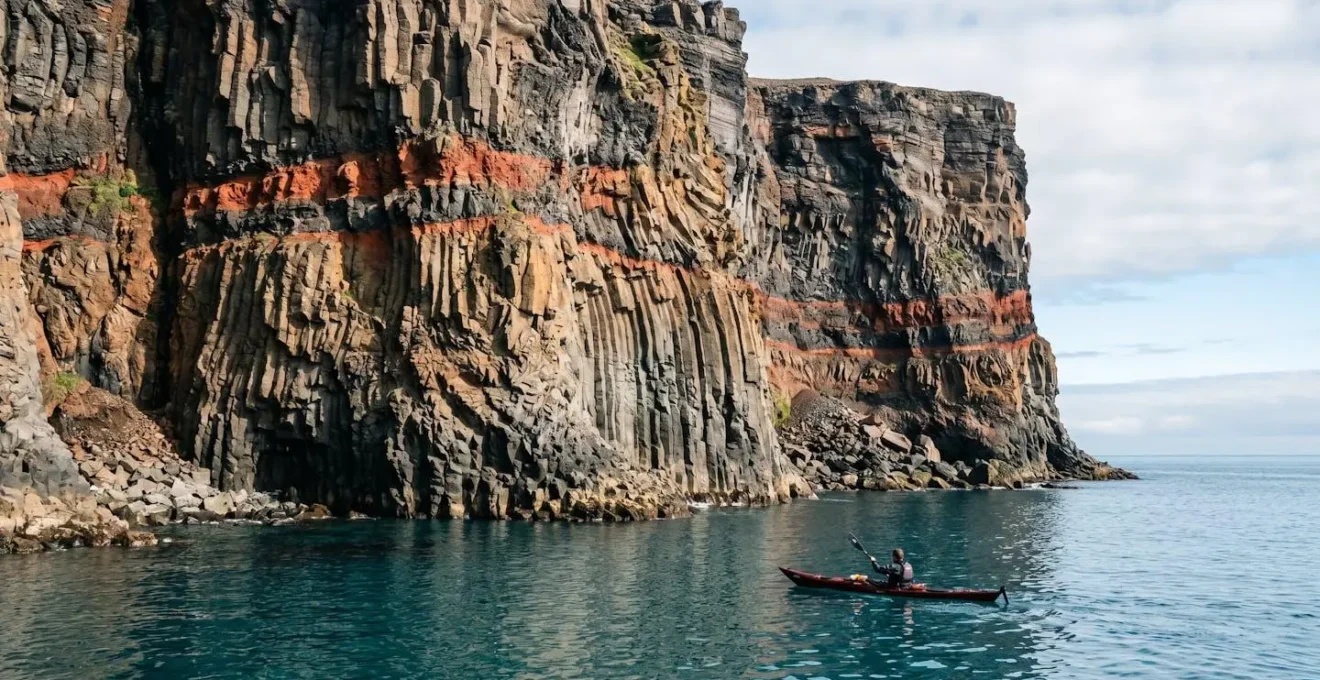
You glide across the water, your kayak or SUP a silent vessel at the foot of giants. Towering volcanic cliffs rise from the sea, a colossal wall of black, red, and grey rock. You see the layers, the caves, the strange geometric patterns, and you know you’re looking at something spectacular. But what exactly are you seeing? What story is this immense rock face telling? For the curious paddler, the desire to understand goes beyond simple admiration; it’s a desire to connect with the landscape on a deeper level.
Most travel guides will point to these cliffs and mention their beauty or their height. They might offer generic advice about “being careful” or point out nesting birds. But they rarely give you the tools to read the landscape for yourself. They treat the cliff as a static backdrop rather than what it truly is: a dynamic, living record of immense geological power, slow erosive artistry, and ecological resilience. This guide is different. It’s designed to turn you, the paddler, into a field geologist for the day.
This isn’t about memorizing rock types. It’s about learning a new language—the language of the Earth, written in stone. We will move beyond the surface-level platitudes and delve into the “why” behind the “what.” Why are some layers bright red? How, precisely, does the ocean carve a cave? Why do some birds choose one ledge over another? By understanding the processes, you transform your paddle from a simple tour into a journey of scientific discovery. We will explore the tell-tale signs of ancient eruptions, the mechanics of coastal erosion, the specific habitats created by the rock, the real risks to be aware of, and how to use this knowledge to enhance your experience, from photography to navigation.
This article provides a framework for reading the geological story chapter by chapter, directly from your vantage point on the water. Below, we break down the key elements to look for, turning your gaze from passive observation to active interpretation.
Table of Contents: Reading the Volcanic Walls: A Kayaker’s Field Guide
- Why Are There Red Layers Sandwiched Between Black Basalt Rocks?
- How the Atlantic Ocean Carves Caves into the Cliffs Over Centuries?
- Ospreys vs Gulls: Who Nests High on the Vertical Walls?
- The Risk of Paddling Too Close to the Base of Unstable Cliffs
- When to Photograph the Walls for Maximum Texture Relief?
- Why Do Basalt Columns Form Perfect Hexagonal Shapes Underwater?
- Why Canarian Pine (Tea) Is Termite Resistant and Fire Proof?
- Kayaking Los Gigantes: How to Handle the Return Trip Against the Trade Winds?
Why Are There Red Layers Sandwiched Between Black Basalt Rocks?
From your kayak, one of the most striking features you’ll notice on a volcanic cliff is the distinct layering: thick, dark bands of black basalt alternating with thin, rusty-red stripes. It’s tempting to think this is just a different type of rock, but the truth is far more interesting. That red layer isn’t a lava flow at all; it’s the ghost of an ancient landscape. This material is a paleosol, which is the scientific term for a fossilized soil.
Imagine a massive volcanic eruption ceases. For hundreds or even thousands of years, the surface of the new black basalt rock is exposed to the elements. Rain, wind, and organic matter begin to break it down, forming a soil rich in iron and other minerals. Plants may even take root. Then, a new eruption occurs, and a fresh river of molten basalt flows over this landscape, burying the soil. The intense heat bakes the soil, oxidizing the iron within it—essentially, rusting it—which turns it into that characteristic reddish-brown color we call “red beds” or baked horizons.
So, when you see a red layer, you are not just seeing a different color; you are seeing a gap in time. Each red band represents a period of quiescence, a pause in the volcanic fury long enough for a living ecosystem to establish itself, only to be entombed by the next fiery chapter. The thickness of the paleosol can even give clues about how long this peaceful interval lasted. This understanding is supported by research on volcanic stratigraphy that reveals these tephra layers are consistently separated by such paleosols.
How the Atlantic Ocean Carves Caves into the Cliffs Over Centuries?
The sea caves and arches that punctuate the base of volcanic cliffs are some of the most dramatic features you can explore by kayak. They seem like gateways to a hidden world, but they are the result of relentless, patient destruction by the ocean. The primary sculptor is the sheer force of the waves, but it employs several distinct tools to get the job done. From your vantage point at water level, you are perfectly positioned to see the evidence of these processes at work.
The ocean’s methods are not random. It is an expert at finding and exploiting any pre-existing weakness in the rock face—a fault line, a fracture, or a less consolidated layer between two harder lava flows. Once a weakness is identified, the assault begins. As a paddler, you can learn to spot the signs of the three main erosional forces:
- Hydraulic Action: This is the most powerful force. As waves crash into cracks, they compress the air trapped inside with immense pressure. As the wave retreats, this air expands explosively, shattering the rock from within. Look for angular, fractured rock and listen for the deep “boom” as water surges into a confined space.
- Abrasion: Waves are always armed with sediment—sand, pebbles, and even boulders. These act like liquid sandpaper, grinding away at the base of the cliff. Look for smooth, polished, or concave surfaces at the waterline, evidence of this constant grinding.
- Corrosion: This is a chemical attack. The saltwater itself can slowly dissolve certain minerals within the volcanic rock, weakening its structure over time. This is often less visually dramatic but contributes to the overall breakdown.
According to experts in coastal geomorphology, one of these forces stands out. In an analysis on sea cave formation, the specialists at Biology Insights note:
The most powerful process in sea cave formation is hydraulic action, which is the force of the water itself impacting the rock face.
– Biology Insights, What Is the Main Process That Forms Sea Caves? – Sea Cave Formation Analysis
By recognizing these different forms of erosion, you can start to understand why a cave formed in one spot and not another, reading the ongoing battle between the land and the sea.
Ospreys vs Gulls: Who Nests High on the Vertical Walls?
As you paddle along the base of the cliffs, your eyes will inevitably be drawn upward to the vibrant birdlife that calls these vertical landscapes home. While you might see various gulls and seabirds, pay close attention to the nesting sites. The geology of the cliff face dictates not just where birds can nest, but *which* birds. Ospreys and gulls, for example, have vastly different requirements, and their choices are a direct reflection of their evolutionary strategies.
Gulls are often generalists. You’ll find them nesting in colonies on wider, more accessible ledges, sometimes on slopes you could almost imagine climbing. They rely on numbers for safety. Ospreys, on the other hand, are specialists that require a fortress. These large raptors need a nest site with a commanding view, an easy flight path for approaching with fish, and, most importantly, complete inaccessibility to ground-based predators. The sheer, hard basalt cliffs provide the perfect solution.
An Osprey nest, known as an eyrie, is a massive structure of sticks that can be used and added to for generations, sometimes growing to over 10 feet deep. It requires a wide, stable base on an isolated ledge or pinnacle. The verticality of the cliff is its best defense. As noted in studies of their life history, these birds specifically seek out cliffs because their sheer faces create a natural barrier against terrestrial threats. Some ornithological field studies document nests at heights of 90m (300ft) on cliff faces, far beyond the reach of any climbing predator. So, if you spot a very large stick nest perched precariously on a high, isolated ledge, you are almost certainly looking at the home of an Osprey, a master of using geology to its advantage.
The Risk of Paddling Too Close to the Base of Unstable Cliffs
While the allure of paddling right up to the colossal cliff face, touching the ancient rock, and peering into sea caves is powerful, it’s crucial to temper that curiosity with a healthy respect for the forces at play. The same processes that create the dramatic beauty of these cliffs also make them inherently unstable. Understanding the *geological* reasons for this instability is the key to assessing risk and staying safe.
The most obvious danger is rockfall. This isn’t a random occurrence; it’s a predictable consequence of erosion. The hydraulic action of waves relentlessly undercuts the base of the cliff, removing support for the rock above. Over time, this creates an overhang that will eventually fail under its own weight. Look for a deep notch or “wave-cut” groove at the waterline—this is a clear sign of active undercutting and a warning that the cliff above is losing its foundation.
Furthermore, the cliffs are riddled with the very fractures and weaknesses that the ocean exploits to form caves. These vertical joints and softer layers between lava flows are planes of weakness. Water can seep into these cracks, and in colder climates, the freeze-thaw cycle acts like a jack, pushing the rock apart. Even in warmer climates, the simple hydraulic pressure of rainwater can weaken these joints. A section of cliff might look solid, but it could be held in place by only a small amount of remaining rock. A large wave, a minor earth tremor, or simply gravity can be the final straw that triggers a collapse.
A safe rule of thumb is the “height equals distance” principle: try to stay a distance from the cliff base that is at least equal to the height of the most fractured or overhanging section. While not always practical, it serves as a good mental reminder of the potential hazard zone. The cliff is a dynamic, not a static, environment. Read its signs of instability just as you read its signs of beauty.
When to Photograph the Walls for Maximum Texture Relief?
Photographing volcanic cliffs from a kayak presents a unique challenge and opportunity. You are trying to capture the immense scale, the dramatic colors, and the intricate textures of the rock from a moving platform on the water. The secret to transforming a flat, uninspiring snapshot into a powerful geological portrait lies in one key element: light. Specifically, you need to understand how the angle and quality of light interact with the rock face to reveal its three-dimensional character.
The worst time to photograph a cliff is midday. When the sun is directly overhead, it casts very few shadows. This flat, frontal lighting effectively erases all the texture and relief. The columnar joints, flow band ridges, and rough surfaces all disappear into a single, two-dimensional plane. Your photo will look washed out and lack depth. The magic happens when the sun is at a low angle, striking the cliff from the side. This “raking light” casts long shadows into every crack and crevice, sculpting the rock and revealing its true form and texture. This is why professional landscape photographers are so obsessed with the “golden hours” after sunrise and before sunset.
Another pro-tip from a kayaker’s perspective is to use water to your advantage. A rock face that has just been splashed by a wave or dampened by a light rain shower will have its colors dramatically enhanced. The wet basalt becomes a deeper, richer black, and the mineral colors in the paleosol layers and dykes become far more saturated. This contrast between wet and dry rock can add a fantastic dynamic element to your composition.
Your Action Plan: Capturing Geological Textures
- Time Your Shoot: Aim for mid-morning (9-11 AM) or mid-afternoon (3-5 PM) when the sun is at a low angle to the cliff face, creating dramatic side-lighting.
- Embrace Wet Rock: Photograph rock faces immediately after a wave splash. The moisture will increase color saturation and contrast by as much as 40-60%.
- Avoid High Noon: Steer clear of shooting between 11 AM and 2 PM. The overhead sun eliminates shadows and makes geological features appear flat and lifeless.
- Compose with Geology: Use the natural lines in the rock—vertical dykes, horizontal lava flows—as compositional elements to guide the viewer’s eye. Frame a distant view through a sea arch.
- Check for Stability: Ensure your paddle, your position relative to swell, and your camera settings are secure before focusing on the perfect shot.
By thinking like a geologist and a photographer, you can move beyond simple snapshots and start creating images that truly capture the power and intricate story of the volcanic walls.
Why Do Basalt Columns Form Perfect Hexagonal Shapes Underwater?
Among the most awe-inspiring geological sights are the vast fields of columnar basalt, like the famous Giant’s Causeway. From your kayak, you might see these patterns at the base of a cliff or forming entire headlands. They look so perfect, so geometric, that they seem artificial. The common explanation is that they form as lava cools and cracks, but the real process is a beautiful example of physics optimizing energy. And the “perfect” hexagonal shape is actually a bit of a myth.
The process, known as columnar jointing, begins when a thick flow of basaltic lava stops moving and starts to cool. The cooling happens from the top down and the bottom up. As the lava cools, it contracts, creating immense tension or thermal stress within the rock. The rock relieves this stress by cracking. For the stress to be relieved most efficiently and uniformly, the cracks ideally form at 120-degree angles to each other. This three-way split is the most stable and energy-efficient pattern, and a grid of such cracks naturally creates hexagons. You can see the same physics at a much smaller scale in drying mud flats.
Case Study: The Role of Water in Perfecting Columns
Research on basaltic lava flows demonstrates that rapid, uniform cooling provided by seawater creates the most geometrically perfect columnar jointing. The water acts as an ideal cooling medium, providing consistent thermal extraction rates across the lava surface. This uniform cooling creates evenly-spaced contraction centers that naturally optimize into hexagonal patterns due to the 120° angle being the most energy-efficient configuration for thermal stress relief, similar to drying mud but at geological scale.
While hexagons are the most common and efficient shape, a close inspection from your kayak will reveal that nature is rarely perfect. In reality, you will see a mix of shapes. In fact, detailed field measurements at Staffa and Giant’s Causeway show that there are dominantly 5-, 6- and 7-sided columns. As the cooling front moves through the lava, these cracks grow downwards, forming the long columns you see today. The process occurs at incredibly high temperatures, as explained by researchers in the journal Nature Communications:
Columnar jointing forms in the purely elastic regime of rocks between 890 and 840 °C, well within the solid state of volcanic rocks.
– Vasseur et al., Disclosing the temperature of columnar jointing in lavas – Nature Communications
This means the rock is solid, but still blisteringly hot, when these perfect-looking cracks form.
Why Canarian Pine (Tea) Is Termite Resistant and Fire Proof?
While your primary focus from the kayak is on the coastal geology, your gaze might wander to the vegetation clinging to the cliff tops or covering the slopes behind them. In places like the Canary Islands, you may be looking at the remarkable Canarian Pine (*Pinus canariensis*). This tree has evolved a suite of incredible adaptations to its volatile, volcanic home, making it famously resistant to both fire and termites.
The secret to its resilience lies in its wood, particularly its heartwood, known locally as “Tea.” This heartwood is incredibly dense and saturated with resin. This high resin content is a direct evolutionary response to its environment. The volcanic soils it grows in are rich in nutrients, allowing the tree to produce an abundance of this protective chemical cocktail. The resin makes the wood unpalatable and toxic to termites and other boring insects, providing a powerful natural defense that has made it a prized building material for centuries.
Even more impressively, the Canarian Pine has a unique relationship with fire, a common threat in volcanic landscapes. While an intense fire will scorch the outer bark and needles, the tree has several survival strategies. Firstly, the thick, layered bark acts as a thermal shield, protecting the vital cambium layer underneath. Secondly, even if the main trunk and branches are severely burned, the tree has dormant (epicormic) buds embedded deep within the wood. After a fire, these buds can sprout, allowing the tree to regenerate its foliage and continue growing. This ability to essentially rise from its own ashes is a rare trait among pines and a testament to its adaptation to a world of lava and fire.
So, as you look up from the water, the trees you see are not just decoration. They are a living extension of the geological story, their very biology shaped by the volcanic ground beneath them. They are survivors, carrying the story of the land within their own rings and resin.
Key takeaways
- Red layers between black basalt are not rock, but ancient, baked soils (paleosols), indicating significant time gaps between lava flows.
- The iconic hexagonal shape of basalt columns is a direct result of the physics of cooling, as thermal stress is most efficiently relieved through cracks forming at 120-degree angles.
- The shape of a cliff directly influences local conditions; vertical faces can create a “wind shadow” offering paddlers shelter, a principle of using geology for navigation.
Kayaking Los Gigantes: How to Handle the Return Trip Against the Trade Winds?
Your geological knowledge is more than just a tool for satisfying curiosity; it can be a practical asset for navigation and safety, especially when facing challenging conditions like a strong headwind on your return paddle. The trade winds, particularly in the afternoon, can turn a pleasant trip into an arduous slog. However, by reading the landscape and understanding how the cliffs interact with the wind, you can develop a smarter, more energy-efficient strategy.
The most important concept to master is the wind shadow. A massive vertical cliff face doesn’t just block the wind; it deflects it. The wind is forced up and over the top of the cliff, creating a zone of relatively calm air and water right at its base. By “hugging the coast” (while maintaining a safe distance as discussed earlier), you can often find a corridor of much-reduced wind, allowing you to make progress with far less effort. Look for where the water’s texture changes from choppy to smooth; this line marks the edge of the wind shadow.
Furthermore, use the macro-features of the coastline. Headlands and coves are not just scenic points; they are strategic rest stops. Paddle hard across the exposed sections, then tuck into the lee of a headland to catch your breath and recover in calmer water before tackling the next stretch. Also, be aware of katabatic winds. In the afternoon, the dark basalt rock, heated by the sun, causes the air above it to rise. This pulls in cooler, denser air from the sea to replace it, often intensifying the onshore wind between 2 PM and 5 PM. If possible, plan your return trip for earlier in the day to avoid this peak wind period. By combining these geological insights with efficient paddling techniques—like a low-angle, high-cadence stroke and feathering your paddle—you can turn a battle against the wind into a tactical and rewarding journey.
With this newfound ability to read the volcanic walls, every paddle becomes an opportunity for discovery. Your next step is to get out on the water and start applying these observational skills, transforming your view of the coast from a simple landscape into a rich, geological narrative.