In summary:
- Your compass can be unreliable near Tenerife’s volcanic rocks; learn to identify and compensate for magnetic anomalies.
- Use consistent depth contours and sand ripple patterns as your primary guides on featureless slopes.
- Mastering buoyancy and finning techniques is crucial for maintaining visibility needed for natural navigation.
- In overhead environments like lava tubes, strict air management (Rule of Thirds) and exit-first thinking are non-negotiable.
There’s a unique kind of anxiety that sets in when you’re drifting down a vast, sloping, sandy bottom. The surface is a distant shimmer, the bottom offers no distinct features, and every direction looks the same. For many autonomous divers in Tenerife, this is a familiar challenge. You’ve been told to “trust your compass” or “look for landmarks,” but what happens when the volcanic rock makes your compass act strangely and the only landmark is an endless expanse of sand?
The common advice often fails in these specific, magnetically active environments. The solution isn’t to hope for a better compass or a clearer reef. The true key to confident navigation here is to stop looking for features and start reading the environment itself. The featureless seabed is not informationless; it’s telling a story through subtle cues that are far more reliable than your instruments alone. It’s about understanding the language of the volcanic substrate.
This guide moves beyond basic navigation. We will deconstruct the challenges of Tenerife’s unique underwater geology and provide you with the practical skills to turn that daunting, featureless slope into a readable map. You’ll learn to interpret depth, sand, and even the quirks of magnetism to navigate with the calm confidence of an instructor.
To navigate this topic effectively, this article is structured to build your skills from understanding the core problem to mastering advanced techniques in specific environments. Explore the sections below to become a more competent and self-reliant diver in Tenerife’s challenging waters.
Summary: Mastering Natural Navigation in Volcanic Waters
- Why Your Compass Might Give False Readings Near Volcanic Rocks?
- How to Navigate Using Depth Contours Along the Sloping Seabed?
- Sand Ripples vs Rock Ridges: Reading the Bottom for Direction
- The Danger of Drifting Into the Blue Without Visual Reference Points
- How to Calibrate Your Digital Compass for Tenerife’s Magnetic Zone?
- Swim-Throughs vs Dead-Ends: How to Spot the Difference Before Entering?
- How to Perfect Your Finning Technique to Protect Fragile Volcanic Moss?
- Navigating Tenerife’s Lava Tubes: Safety Protocols for Recreational Divers
Why Your Compass Might Give False Readings Near Volcanic Rocks?
The first rule of advanced navigation in a volcanic area is to develop a healthy distrust of your compass. This isn’t because your equipment is faulty; it’s because the ground beneath you is actively working against it. Tenerife’s seabed is forged from basalt, an igneous rock rich in iron. As this lava cooled millennia ago, the iron particles aligned with the Earth’s magnetic field, turning vast sections of the ocean floor into a weak, natural magnet. This phenomenon is known as a magnetic anomaly.
When you swim close to these formations, the localized magnetic field of the rock can overpower the Earth’s much weaker global magnetic field, causing your compass needle to swing erratically or point in the wrong direction. According to geological research, nearly all basaltic rock on Earth is magnetic due to its iron content, making this a fundamental challenge for divers in volcanic regions. This isn’t a new discovery; as an historical case study shows, Icelandic sailors in the 1700s were the first to document these compass variations caused by lava deposits on the seabed.
Understanding this “why” is your first step to mastery. Instead of fighting your compass, you learn to recognize when it’s likely to be unreliable (i.e., when you’re close to rock formations) and switch to other, more dependable natural navigation techniques. Think of your compass as a fair-weather friend: reliable in open sand, but not to be trusted in the company of large volcanic rocks.
How to Navigate Using Depth Contours Along the Sloping Seabed?
If your compass can be unreliable, what should you trust? Your depth gauge. On a featureless, sloping seabed, your most reliable “highway” is a specific depth contour. Think of the slope like a hill with horizontal lines drawn on it, each representing a single depth. By committing to follow one of these lines, you create a predictable path that’s easy to reverse.
As navigation experts from Scuba Diving Magazine state, ” Another easy path to follow is a specific depth contour on a sloped reef or wall.” The technique is simple but requires discipline. On your way out, you keep the “downhill” slope on one side (say, your left). On your way back, you simply turn 180 degrees and keep the “downhill” side on your opposite side (now your right). As long as you maintain your target depth, you are guaranteed to retrace your path.
This method requires active monitoring of your depth gauge and excellent buoyancy control. Your goal is to stay within a very narrow depth range, typically +/- 1 meter. This turns your depth gauge from a simple safety device into your primary navigation instrument, giving you a clear, reliable reference when the visual landscape offers none.
- Plan your depth target before descent – choose a specific depth contour (e.g., 18 meters) along the sandy bottom.
- During the outbound swim, maintain this constant depth while keeping the slope on one consistent side.
- Monitor your depth gauge continuously to stay within your target depth, using it as your primary navigation reference.
- For the return journey, execute a 180-degree turn so the slope is now on the opposite side.
- Maintain the same depth contour throughout the return journey to ensure you track back along the same path.
Sand Ripples vs Rock Ridges: Reading the Bottom for Direction
Once you’ve chosen your depth contour, the seabed itself offers the next layer of information. The seemingly monotonous sand is a canvas painted by water movement, providing crucial directional clues. The key is to learn to read the shape of the sand ripples. These are not random; they are a direct indicator of the prevailing water current.
This is where “environmental storytelling” comes into play. As geological studies demonstrate, unidirectional currents produce asymmetric ripples with a gentle slope on the side the current comes from, and a steep drop-off on the other side. By observing this pattern, you have a constant, natural arrow pointing in the direction of the current. You can use this as a relative direction—”I am swimming with the ripples to my right”—to create a mental map.
This is invaluable. If you know the direction of the current on your way out, you know that to return, you simply need to swim against it. This technique, combined with depth contour following, creates a powerful two-factor navigation system that is completely independent of your compass or visual landmarks. You are no longer looking *for* the path; you are reading the path from the texture of the seabed itself. This requires you to get close, maintain perfect trim, and use your observational skills.
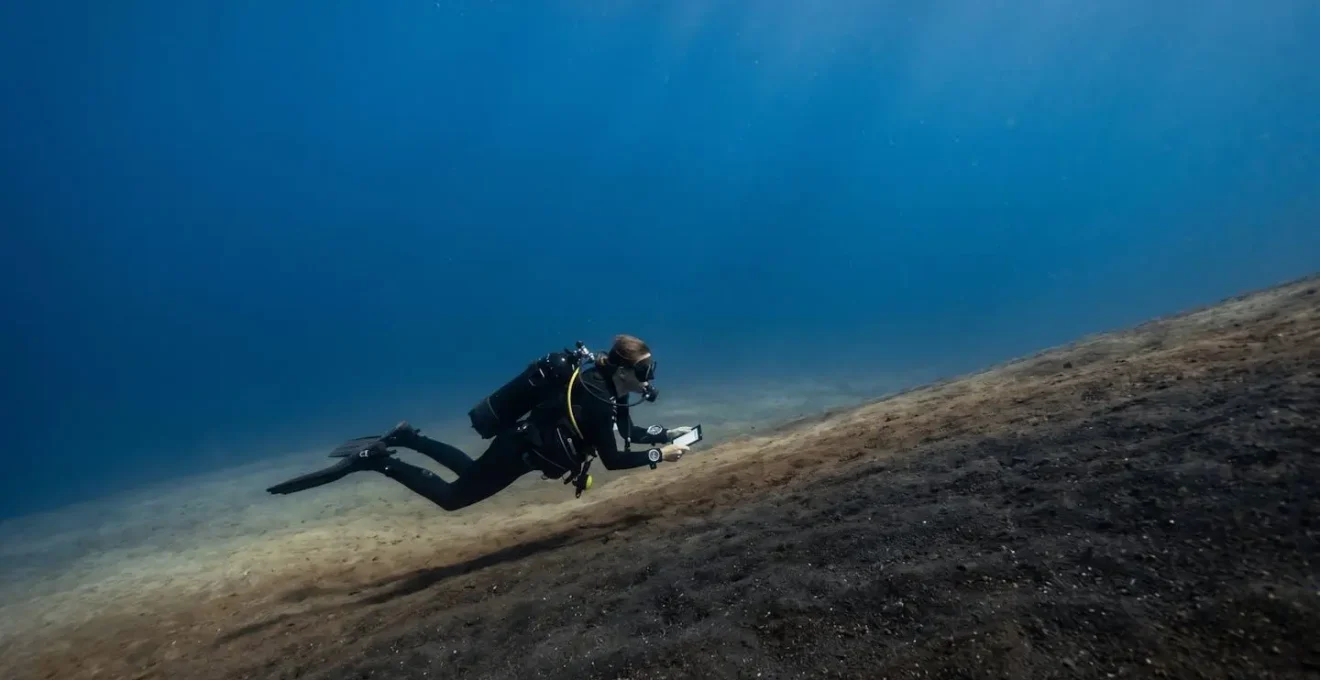
The Danger of Drifting Into the Blue Without Visual Reference Points
Why is mastering these natural techniques so critical? Because the alternative is one of the most disorienting experiences a diver can have: drifting into the blue. On a steep sandy drop-off, a moment of inattention or poor buoyancy can cause you to drift away from the seabed into the vast, featureless water column. Here, there is no up, no down, no forward or back—only a uniform, mesmerizing blue in every direction.
This is a state of severe spatial disorientation. Without any visual reference points, your brain cannot determine your body’s orientation or movement. You may feel like you are ascending when you are actually sinking, or that you are stationary when a current is carrying you away from your starting point. Panic is a common and dangerous reaction in this scenario, leading to rapid breathing, poor decision-making, and an increased risk of a rapid, uncontrolled ascent.
The diver in the image above is in a situation where natural navigation skills are not just useful; they are a lifeline. The ability to calmly check your depth, note the direction of your bubbles, and make a controlled ascent back toward the surface or a descent back to the security of the seabed is paramount. This is the ultimate “why” behind every navigation skill you learn: to prevent this moment of total sensory deprivation, or to manage it safely if it occurs.
How to Calibrate Your Digital Compass for Tenerife’s Magnetic Zone?
Even with a healthy distrust, your compass remains a valuable tool when used correctly. For divers with digital compasses integrated into their computers, proper calibration is not just recommended; it’s mandatory in a magnetically active area like Tenerife. An uncalibrated or poorly calibrated digital compass can be even more misleading than a simple magnetic one because its errors are less obvious.
Calibration should not be done on the dive boat, which is a mass of ferrous metals and electrical fields that can corrupt the process. It must be performed in the water, away from all sources of magnetic interference. This means getting away from the boat, other divers’ steel tanks, and the volcanic seabed itself. The goal is to give your dive computer a “clean” reading of the Earth’s magnetic field so it can more accurately compensate for any deviations it later detects.
Performing this simple ritual before every dive in a new location, especially a volcanic one, transforms your compass from a potential liability into a reliable secondary reference. It’s a key part of your “sensory calibration” before you descend.
Your In-Water Calibration Checklist
- Relocate from Interference: Perform calibration in the water, not on the metal-heavy dive boat.
- Create a Clear Zone: Swim at least 10 meters away from the boat and other divers’ steel tanks before beginning.
- Avoid Bottom Interference: Position yourself at mid-depth, away from the seabed if diving near magnetic volcanic rock.
- Execute the Protocol: Follow your device’s specific calibration protocol (e.g., rotating in a figure-8 pattern) while maintaining neutral buoyancy.
- Verify Before Descent: After calibration, verify your compass bearing against a known reference (sun position, a landmark on shore, or the boat’s direction) before you begin your dive.
Swim-Throughs vs Dead-Ends: How to Spot the Difference Before Entering?
Tenerife’s volcanic landscape is riddled with intriguing swim-throughs, arches, and small caverns. While exciting, they present a new navigation challenge: distinguishing a safe, short passage from a dangerous, dead-end overhead environment. The golden rule of any overhead environment is absolute, as captured by a core cave diving safety principle: “Never enter an overhead environment unless you can clearly see the exit and the entire path to it.”
Before you even think about entering, pause and observe. Look for the light. A true swim-through will have a visible, clear exit, often indicated by a patch of brighter, bluer water at the other end. If all you see is darkness, you are looking at a cave, not a swim-through. Another pro tip is to shine your torch at the entrance and watch the backscatter (the small particles in the water). Is there a gentle flow of water coming out of the opening? This can indicate a connection to a larger system. Is the water still? This might suggest a closed-off space.
Your size and equipment also matter. A “swim-through” for a diver in a simple configuration might be a dangerous entanglement hazard for a diver with a large camera rig or a side-mounted setup. The decision to enter is a personal risk assessment, but the first step is always to correctly identify the nature of the opening in front of you. When in doubt, stay out. The thrill is not worth the risk.
How to Perfect Your Finning Technique to Protect Fragile Volcanic Moss?
It may seem unrelated, but your finning technique is a critical component of natural navigation. On Tenerife’s seabed, stirring up silt or sand isn’t just bad for the fragile marine ecosystem, like the unique volcanic mosses; it’s disastrous for your visibility. A single misplaced kick can create a cloud of sediment that completely obscures the sand ripples and other subtle clues you’re trying to read. Getting lost is significantly easier when you’re swimming in a fog of your own making.
Adopting advanced, silt-free finning techniques is therefore essential. The goal is to achieve horizontal trim and propulsion, directing all water movement backward, not downward. This requires excellent buoyancy control, allowing you to float effortlessly just above the seabed, observing without disturbing. Mastering these kicks means you preserve the clarity of the water, protecting both the environment and your ability to navigate effectively.
- Modified Flutter Kick: Use small, precise movements from the ankles, not full-leg kicks, for minor adjustments near the bottom.
- Frog Kick: Keep your knees bent and push water backward with the soles of your fins. This is the ideal propulsion technique for fragile environments.
- Sculling: For hovering or making tiny position changes while observing, use small, alternating fin movements.
- Horizontal Trim: Ensure your body is parallel to the seabed, so all fin power is directed backward.
- Neutral Buoyancy: Perfect weighting eliminates the need for constant fin adjustments that stir up the bottom.
Key Takeaways
- The volcanic rock in Tenerife creates magnetic anomalies, making your compass unreliable near the seabed.
- Your most trustworthy navigation tools on a featureless slope are your depth gauge (for contour following) and your eyes (for reading sand ripples).
- Strict air management, like the Rule of Thirds, is a non-negotiable safety protocol before entering any overhead environment.
Navigating Tenerife’s Lava Tubes: Safety Protocols for Recreational Divers
The principles of navigating featureless slopes are amplified when you enter one of Tenerife’s most spectacular environments: a lava tube. Here, the “featureless” aspect is not the sandy bottom, but the complete absence of a direct path to the surface. This is the definition of an overhead environment, and it demands a higher level of discipline and adherence to strict safety protocols. This is not the place for improvisation.
The single most important protocol is air management, specifically the Rule of Thirds. This is a non-negotiable rule for any penetration dive, and its application in lava tubes is critical. You use one-third of your gas to enter, one-third to exit, and keep the final third as a safety reserve for emergencies. As technical diving standards emphasize, the use of distance lines is standard practice, but for recreational divers in a simple tube, memorizing unique features on entry (e.g., ‘white sponge, sharp right turn, anchor-shaped rock’) becomes a vital mental guideline to ensure you’re on the correct path out.
Light discipline is also crucial. Your torch is your lifeline and your communication tool. Use clear signals, avoid blinding your buddies, and always be aware of where your light is pointing. Navigating a lava tube is an incredible experience, but it’s one that must be approached with the respect, training, and meticulous planning that all overhead environments demand. It is the ultimate test of a diver’s self-awareness and procedural discipline.
With these techniques, that once-intimidating sandy slope becomes a landscape rich with information. The next step is to consciously apply and practice these skills on every dive. Start by paying attention to the sand on your next safety stop, and build your confidence from there to become a safer, more competent, and more observant diver.