The secret to clean volcanic seascape photos isn’t fighting backscatter with generic rules, but mastering light control in a uniquely dark environment.
- Strobe positioning is for sculpting texture on dark rock, not just flooding the scene with light.
- Your lens choice must be a conscious decision to tell either a grand geological story (wide-angle) or a focused biological one (macro).
Recommendation: Prioritise perfect buoyancy and meticulous gear protection around abrasive basalt rock before you even think about taking the shot.
You surface from an incredible dive in Tenerife, buzzing with the sight of the dramatic underwater landscapes. You eagerly check your GoPro or compact camera, only to find your shots clouded by a frustrating snowstorm of white specks. This is backscatter, the underwater photographer’s nemesis, and it’s notoriously worse against the black volcanic sand and dark lava formations of the Canary Islands. You’ve probably heard the usual advice: “get your strobes off the camera” or “get closer to the subject.” While true, these tips barely scratch the surface of the problem in this unique environment.
What if the problem isn’t just floating particles? What if the real challenge—and the greatest opportunity—lies in the unique physics of volcanic geology? The dark sand doesn’t just create a high-contrast background; it fundamentally changes the way light behaves underwater. It absorbs it. This guide moves beyond generic fixes. It’s about a paradigm shift: learning to sculpt with light on a natural black canvas. We’ll treat the darkness not as a flaw, but as a powerful compositional element.
Throughout this guide, we’ll deconstruct the specific challenges of Tenerife’s waters. We will explore why volcanic sand absorbs so much light, how to position your strobes to create texture instead of backscatter, and how to choose the right lens for the story you want to tell. We’ll also cover the critical, often-overlooked equipment mistakes that can lead to disaster and the secrets to capturing those ethereal light beams in volcanic caverns. This is your blueprint for conquering backscatter and capturing the true, dramatic soul of Tenerife’s volcanic seascapes.
To navigate this deep dive into volcanic underwater photography, this article is structured to build your skills from the foundational physics of light to advanced compositional techniques. The following summary outlines the key areas we will cover, ensuring you have a clear path to mastering every shot.
Summary: A Guide to Conquering Volcanic Backscatter
- Why Volcanic Sand Absorbs More Light Than White Sand Reefs?
- How to Position Your Strobes for Dark Lava Rocks Without Creating Shadows?
- Wide Angle vs Macro: Which Lens to Choose for Tenerife’s Dramatics?
- The Equipment Mistake That Scratches Dome Ports on Basalt Rocks
- When to Dive to Catch the Best Light Beams in Volcanic Caverns?
- Fisheye vs Wide Angle: Which Wet Lens Fits Your Compact Housing?
- How to Choose Mask Lenses That Enhance Contrast in High Visibility?
- Capturing the Scale of the Submarine Amphitheater: Lens Choices for Compact Cameras
Why Volcanic Sand Absorbs More Light Than White Sand Reefs?
The core of the backscatter problem in Tenerife lies in a simple scientific principle: albedo. As the Penn State Earth Science Department explains, albedo is the measure of how much light a surface reflects. In their words, “Black objects have an albedo close to 0, while white objects have an albedo of close to 1.0.” A white sand beach in the Caribbean reflects almost all light, making the scene bright and easy to illuminate. Tenerife’s black volcanic sand does the opposite; it absorbs light like a sponge. This creates a vicious cycle for the photographer: the scene is inherently dark, so you increase your strobe power. This powerful light then illuminates every particle between your lens and the subject, creating a blizzard of backscatter.
The water itself already reflects very little. In fact, ocean surfaces typically have an albedo of 0.06, meaning they reflect only 6% of incoming light. When you combine this with a seabed that also has an albedo near zero, you are working in an environment that consumes light. Understanding this is the first step toward a new strategy. Instead of trying to overpower the darkness—a battle you will always lose to backscatter—you must learn to work with it. Your goal is not to illuminate the entire scene, but to selectively “paint” your subject with just enough light, using the surrounding darkness as a natural, clean frame.
This “light absorption” effect is your biggest challenge but also your greatest creative asset. It allows for dramatic, low-key photography where subjects pop against a pure black background, something that’s much harder to achieve over reflective white sand. The key is precise, controlled lighting, not sheer power. By embracing the low albedo, you can create images with incredible contrast and a powerful sense of drama that is unique to volcanic environments.
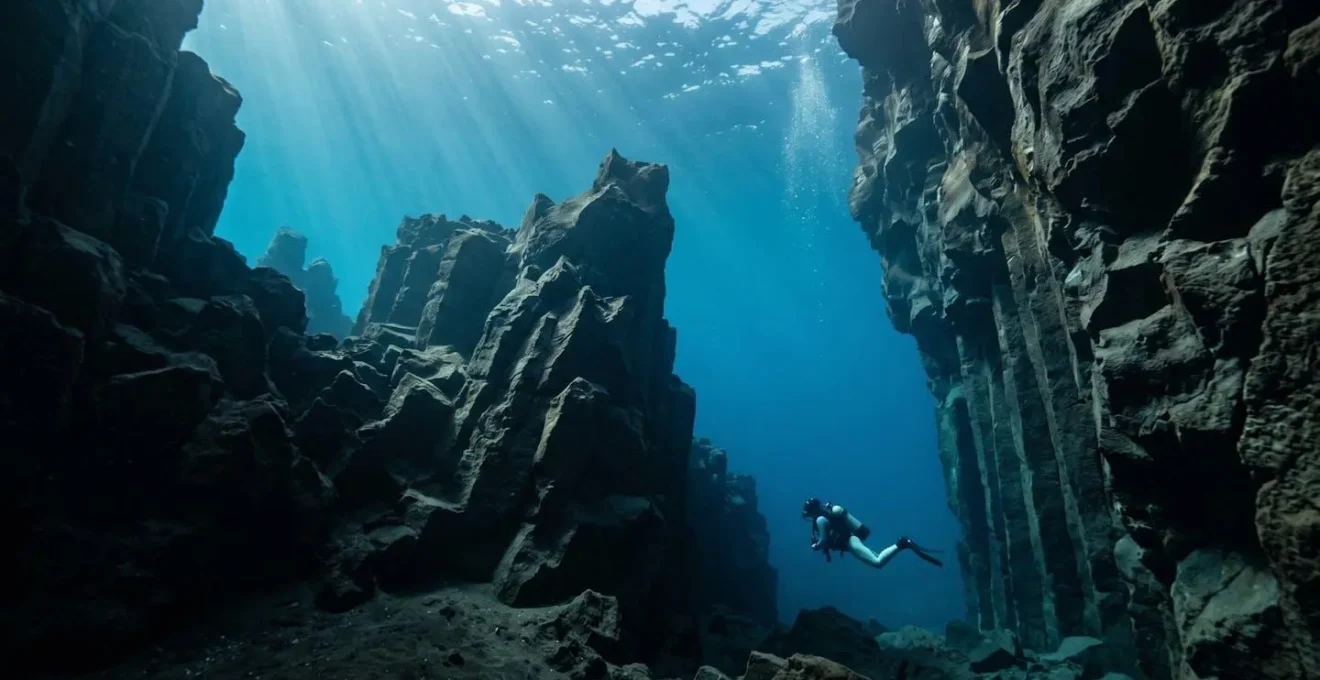
How to Position Your Strobes for Dark Lava Rocks Without Creating Shadows?
Once you accept that you’re painting on a black canvas, strobe positioning becomes an act of sculpting with light. On a bright reef, lighting is about colour and fill. On dark lava, it’s about texture and dimension. Pointing strobes directly at a basalt rock face will flatten its texture and light up a wall of backscatter. The goal is to use ‘raking light’—light that comes from the side—to kiss the edges of the rock, revealing its intricate, crystalline structure while letting the crevices fall into deep, clean shadow.
This is achieved by moving your strobes far from the camera housing and positioning them high, forward, and angled slightly inward. Imagine your strobes are at the 10 o’clock and 2 o’clock positions, extended on long arms. This placement achieves two critical goals: it increases the angle between the lens and the light beams, so fewer particles are lit in the camera’s view, and it creates the dramatic side-lighting that brings volcanic rock to life.
As seen in the image, this technique of side-lighting creates micro-shadows that give the rock a tangible, three-dimensional feel. To achieve this, you must master a few key positions:
- High and Forward: Pull strobes up and forward, pointing them slightly inward. This creates a combination of side and front lighting that is ideal for dark rock.
- Inward-Facing: For subjects away from the rock, position your strobes to point directly inward towards the sides of your camera port. This “wraps” light around the subject while keeping the volcanic background dark.
- Focused Beams: Use snoots or tight diffusers to create a spotlight effect. This is perfect for isolating a small subject and letting the surrounding black rock fall into dramatic, backscatter-free darkness.
- Asymmetrical Lighting: Don’t be afraid to use only one strobe or set one to a lower power. Positioning a single main light source at 10 or 2 o’clock adds strategic shadow and depth, preventing a flat look.
Wide Angle vs Macro: Which Lens to Choose for Tenerife’s Dramatics?
In Tenerife, your lens choice dictates the story you tell. Are you capturing the immense, geological narrative of a massive volcanic amphitheater, or the intimate, biological narrative of a colourful nudibranch on black sand? There is no single “best” lens; the right choice depends entirely on your subject and intent. A wide-angle or fisheye lens is essential for capturing the sense of scale, allowing you to fit entire structures into a single, immersive frame. However, shooting wide means more water between you and your subject, increasing the potential for backscatter if not lit carefully.
Macro lenses (60mm to 105mm) excel at the opposite. They allow you to get extremely close to small subjects, filling the frame and creating a shallow depth of field that beautifully isolates the subject against a soft, black background. This is where the dark sand becomes your ally, providing a naturally dramatic, high-contrast canvas. The challenge with macro is the risk of kicking up the fine volcanic sand when getting low and close.
Case Study: The Power of Close-Focus Wide-Angle (CFWA)
A powerful hybrid technique is Close-Focus Wide-Angle (CFWA). As detailed by UW Photography Guide, this method uses a wide-angle or fisheye lens to get extremely close to a foreground subject (like a starfish or an anemone) while keeping the vast volcanic background in sharp focus. This creates a dynamic composition that tells both a biological and a geological story in one shot. It requires getting very low, approaching from below if possible, and using strobes in a position similar to macro photography—pulled in close and on low power to light only the immediate foreground.
The choice can be overwhelming, but it can be simplified by thinking about the dive site itself. A structured approach based on the environment helps in making the right decision before you even get in the water.
| Dive Site Typology | Recommended Lens Type | Focal Length | Narrative Purpose | Key Advantage |
|---|---|---|---|---|
| The Amphitheaters (massive formations) | Fisheye | 8-15mm | Geological Narrative | Capture entire volcanic structures in single frame with immersive perspective |
| The Sandy Slopes (critter hunting) | Macro | 60-105mm | Biological Narrative | Isolate colorful small subjects against black sand background with dramatic contrast |
| The Caverns (light beams) | Fast Wide-Angle | 16-35mm f/2.8 | Atmospheric Narrative | Capture dramatic light rays while maintaining ability to shoot in low ambient light |
| Mixed Terrain | CFWA (Close-Focus Wide-Angle) | 10-17mm zoom | Synthesis Narrative | Shoot small foreground subject with volcanic background context in same composition |
The Equipment Mistake That Scratches Dome Ports on Basalt Rocks
The volcanic rock that makes Tenerife’s seascapes so dramatic is also incredibly abrasive. Basalt is sharp, unforgiving, and often covered in tiny, razor-like barnacles. For photographers, especially those shooting wide-angle with a large dome port, this presents a significant financial risk. The most common and costly mistake is getting too close to a rock face for a shot, only to have a surge push your expensive port directly into the basalt. While glass domes are more resistant than acrylic, a bad scrape can still be a trip-ending disaster.
The danger is real and can have lasting consequences, as one photographer shared. In a discussion on dome port materials, Bryan Chu noted the difference in durability after an incident:
I scraped my dome port on the barnacles or the rocks, no damage was done to the glass. Another trip attendee had an acrylic port, and scratched it so badly he had to move his focus point off to the side
– Bryan Chu, Dome Ports: Acrylic vs Glass – Underwater Photography Guide
This highlights the importance of not just choosing the right material, but developing impeccable habits to protect your gear. Perfect buoyancy is non-negotiable. You must be able to hold your position effortlessly, inches from the rock, without drifting or sculling. This is more important than any camera setting. Beyond buoyancy, a specific set of protective measures can save your gear from the harsh volcanic environment.
Your Basalt-Proofing Action Plan: A Checklist for Dome Port Protection
- Cover Up: Use neoprene dome port covers right up until the moment of shooting, and put them back on immediately after. This is especially critical during entries and exits in surge zones near rocks.
- Master the Back-Fin: Practice back-finning to move away from rock faces without turning your body. This keeps your dome port in your line of sight and away from accidental contact.
- Add Ballast: Add an extra 1-2 pounds (about 0.5-1 kg) of weight to your system. This enhances stability when shooting in shallow, surgy areas near volcanic formations, preventing you from being pushed into the rock.
- Invest in Glass: For volcanic destinations, strongly consider investing in a glass dome port. It withstands scratches better than acrylic, though be aware that deep scratches in glass cannot be polished out.
- Practice Low-Angle Buoyancy: Perfect your buoyancy control specifically for taking low-angle shots near the seabed, where the risk of basalt contact is highest.
When to Dive to Catch the Best Light Beams in Volcanic Caverns?
One of the most sought-after shots in Tenerife is the ethereal image of sunlight piercing the darkness of an underwater volcanic cavern. These “cathedral lighting” effects, or crepuscular rays, are a result of the Tyndall effect, where light is scattered by suspended particles, making the beams visible. Ironically, the very particles that cause backscatter are what create these beautiful rays. The key is to position yourself where the particles are lit by ambient light from the cavern entrance, not by your strobes.
Timing is everything. The best light beams typically occur when the sun is at a 45-degree angle to the cavern entrance, not directly overhead. This means that mid-morning or mid-afternoon dives are often more productive than diving at high noon. At noon, the light comes straight down and may not penetrate deep enough or at the right angle to create dramatic diagonal rays. You need to know the orientation of the cavern you plan to dive and consider the sun’s path to predict the optimal time.
Capturing these scenes requires turning off your strobes and shooting with ambient light. This means you’ll need a higher ISO and a wider aperture. But the most important technique is patience and stillness. As experienced photographers will tell you, the key to a crisp light beam shot is to stop all movement.
Experienced underwater photographers emphasize that the key to capturing crisp light beam shots is stopping all movement and controlling breathing to become perfectly still. After positioning yourself in the optimal spot, you must wait for the water to settle from your own movement and your buddy’s finning before taking the shot. This patient approach eliminates the haze created by disturbed particles and allows the light beams to appear sharp and well-defined rather than diffused.
– The Patient Hover Technique
Fisheye vs Wide Angle: Which Wet Lens Fits Your Compact Housing?
For the compact camera or GoPro user, the world of wide-angle photography is opened up by “wet lenses”—lenses that attach to the outside of your housing underwater. The two main choices for volcanic seascapes are fisheye and rectilinear wide-angle lenses. A fisheye wet lens offers the widest possible field of view (often 140° or more), allowing you to get incredibly close to subjects while still capturing the vastness of the surrounding environment. This creates the signature immersive, curved look that can be very powerful for massive volcanic structures. The downside is the noticeable “barrel distortion,” where straight lines appear bent.
A rectilinear wide-angle wet lens, by contrast, keeps straight lines straight. This is a huge advantage when photographing geometric basalt columns or the structured entrances to caverns, preserving a more natural, less distorted perspective. The trade-off is a slightly narrower field of view (typically 90-120°). For a compact camera user, the decision also involves handling and risk. Larger, heavier wet lenses can be cumbersome and increase the chance of scratching on sharp rocks.
Choosing the right lens involves balancing your creative goals with the practical realities of diving in a challenging environment. The size and weight of the lens directly impact your maneuverability and safety around the abrasive basalt formations.
| Wet Lens Type | Field of View | Best Use for Volcanic Environments | Distortion Characteristic | Handling Around Sharp Rocks |
|---|---|---|---|---|
| Fisheye (large) | 140-170° | Immersive shots of massive structures, entire wrecks in single frame | Barrel distortion with curved lines | Difficult – large size increases contact risk |
| Rectilinear Wide-Angle (large) | 90-110° | Preserving straight geometric lines of basalt columns and cave structures | No distortion – straight lines remain straight | Difficult – heavy and large |
| Compact Fisheye (small) | 120-140° | Versatile for mixed terrain with lower scratch risk | Moderate barrel distortion | Good – smaller profile, easier to maneuver |
| Compact Wide-Angle (small) | 100-120° | General purpose volcanic landscape with safety priority | Minimal distortion | Excellent – lightweight, safer choice for rocky environments |
How to Choose Mask Lenses That Enhance Contrast in High Visibility?
In Tenerife, you’ll often be blessed with crystal-clear visibility, sometimes exceeding 30 metres. While this sounds perfect, it can create a visually “flat” scene for the photographer’s eye. The sheer amount of blue light can wash out contrast, making it difficult to spot subjects or compose a dynamic shot. This is where a lesser-known piece of gear comes into play: coloured mask lenses. While standard clear lenses are the norm, masks with slight amber or magenta tints can dramatically improve a photographer’s visual experience.
These tinted lenses work by filtering out a portion of the blue light spectrum. This artificially increases the luminance contrast, making reds, oranges, and yellows appear more vibrant and helping to separate a subject from its background. It can reduce eye strain on long dives and, most importantly, help you “see” a better composition before you even raise the camera. You’re better able to notice the subtle textures on a rock or the way light falls across a subject.
Case Study: Enhancing the Photographer’s Vision
As noted in a feature on diving in Tenerife, the value of these lenses is purely for the photographer’s perception. It’s crucial to understand that a tinted mask has zero effect on the actual photograph. Your camera’s sensor captures the light as it is, unaffected by what you see through your mask. The benefit is entirely in the pre-shot process. By seeing the scene with enhanced contrast, you are more likely to identify compelling subjects and compositional opportunities that you might have otherwise missed in the visually overwhelming blue environment. It’s a tool for improving your artistic eye, not your camera’s optics.
Choosing a tinted mask is a personal preference. For photographers who find themselves struggling to find compelling compositions in high-visibility conditions, it can be a genuine game-changer, making the underwater world appear more vibrant and three-dimensional. It allows you to compose with more confidence, even if the final image will be rendered by the unfiltered eye of your camera.
Key takeaways
- The root of the backscatter problem is volcanic sand’s low albedo; your strategy must be to sculpt with light, not flood the scene.
- Strobe positioning (high, forward, and angled) is your primary tool for creating texture, controlling shadows, and minimising backscatter.
- Your lens choice dictates the narrative: use a fisheye for grand geological scale, a macro for intimate subject detail, and consider CFWA for combining both.
Capturing the Scale of the Submarine Amphitheater: Lens Choices for Compact Cameras
Some of Tenerife’s most awe-inspiring dive sites are its submarine amphitheaters—colossal, curved walls of basalt that dwarf everything around them. The single greatest challenge in photographing these formations is conveying their immense scale. A photo of a giant rock wall is just a photo of a rock wall until you provide a familiar reference point. The most effective way to do this is to include a human element. Placing a dive buddy, small in the frame, instantly gives the viewer’s brain the context needed to understand the sheer size of the geological structure.
For a compact camera user, this presents a wide-angle challenge. You need a lens wide enough to capture both the diver and the massive sweep of the amphitheater. This is where a fisheye wet lens truly shines. By getting close to your buddy (who might be 10-15 feet away) you can keep them relatively large while the fisheye’s vast field of view pulls in the entire amphitheater behind them.
Beyond lens choice, several techniques can help compact camera users convey this massive scale:
- Shoot from a Distance: Position yourself as far from the main wall as water clarity allows. This helps fit the entire structure into your frame, even with a less-extreme wide-angle lens.
- Use a Diver as a Focal Point: Illuminate your dive buddy with a single torch or a focused strobe. This small pool of light draws the eye and makes them a clear point of reference against the vast, dark backdrop.
- Create a Panorama: If a single shot won’t do, use the photo stitching technique. Shoot a sequence of overlapping vertical images as you pan across the amphitheater, then merge them in post-production to create a high-resolution panoramic image that captures a scale no single wet lens could.
- Leverage Video: Sometimes a still photo can’t capture the three-dimensional grandeur. A slow pan or a fly-through video clip can be more effective. You can even pull a high-quality still frame from a 4K video as a hybrid solution.
Now that you are equipped with the technical knowledge to manage light, select lenses, and protect your gear, the next step is to get in the water and practice. Start by focusing on a single technique, such as side-lighting or including a scale reference, and master it before combining them. Your journey to capturing Tenerife’s dramatic soul has just begun.