A sub-€20 dive at Montaña Amarilla is absolutely achievable, but it’s a victory of logistics and timing, not a simple purchase.
- The core cost is a single air fill (€5-€8), which requires you to own or rent a tank separately and have transport.
- Safety is your responsibility; mastering the tide schedule and rocky entry is non-negotiable to avoid the “Tidal Trap”.
Recommendation: Plan your dive for a weekday afternoon to avoid crowds, get your own tank filled at a local station, and always dive 2-3 hours before high tide to ensure a safe exit.
The iconic yellow tuff of Montaña Amarilla, plunging into the turquoise Atlantic, is one of Tenerife’s most photographed landscapes. For divers, it’s a siren’s call. Dive centers in the south are happy to answer that call, packaging the experience into a guided tour for €50, €60, or even more. They handle the gear, the transport, the timing—and the bill reflects that convenience. This leaves the independent, budget-conscious diver wondering if it’s possible to experience this underwater marvel without paying the premium.
The answer is a resounding yes, but the path to a sub-€20 dive is not found in a discount code. It lies in a fundamental shift in approach. It’s about trading convenience for autonomy, and cost for personal planning. It requires you to think like a local, not a tourist; to become your own dive guide, logistics manager, and safety officer. This guide is built on that very principle: the DIY Diver’s Trade-Off. We will dissect the costs, master the essential logistics, and navigate the specific risks of this site. Forget the generic advice; this is your tactical plan to unlock one of Tenerife’s best shore dives on a shoestring budget.
This comprehensive guide details the exact steps and considerations for your autonomous dive. From safe entry techniques to budget breakdowns, we’ll cover every aspect to ensure your dive is both cheap and safe.
Summary: Your DIY Dive Plan for Montaña Amarilla
- Why Montaña Amarilla Is a Favourite Among Local Independent Divers?
- How to Enter and Exit Safely on Slippery Volcanic Rock Steps?
- Renting Tanks vs Filling Your Own: Logistics for Independent Divers
- The Risk of Tide Changes Trapping You on the Rocks After the Dive
- When to Dive Montaña Amarilla to Avoid Weekend Crowds?
- Why Boat Diving Accesses Superior Sites Compared to Shore Diving Here?
- Supermarket vs Restaurant: Daily Food Costs in Tenerife South
- Planning a Tenerife Dive Trip: How to Budget for a 1-Week Stay in High Season?
Why Montaña Amarilla Is a Favourite Among Local Independent Divers?
While tourist brochures and dive centers rightly praise Montaña Amarilla for its stunning underwater landscapes, the real reason it holds a special place for local and independent divers runs deeper than geology. It’s not just a dive site; it’s a social ecosystem. While many sites are accessible only via commercial boat trips, Playa Amarilla offers true walk-in freedom, creating a hub for those who prefer autonomy over guided tours.
The essence of this community spirit is found not underwater, but right at the water’s edge. This unofficial social club atmosphere provides something commercial dive centers cannot replicate: a sense of shared discovery and camaraderie. Here, divers swap stories, share tips on conditions, and even find last-minute buddies over a cheap beer, still dripping wet in their flip-flops. It’s this combination of world-class accessibility and an unspoken social network that makes it a true favourite, not just for the quality of the dive, but for the freedom it represents.
Case Study: Mana Nui Chiringuito – The Social Hub for DIY Divers
Right next to Playa Amarilla sits Mana Nui Chiringuito, a small beach bar that has become the unofficial meeting point for independent divers. The laid-back atmosphere welcomes divers straight from the water, offering cold beers and simple meals. This informal gathering spot allows DIY divers to connect, share tips, and find dive buddies—creating the unspoken social network that commercial dive centers cannot replicate.
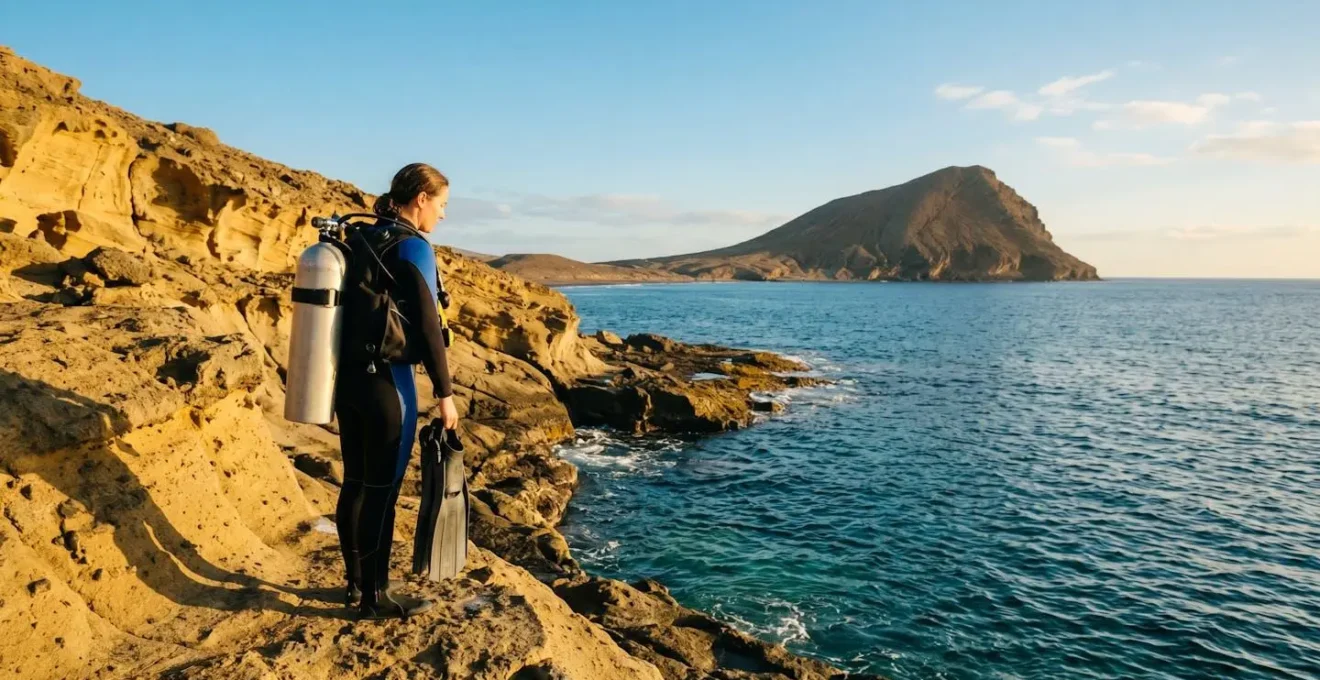
How to Enter and Exit Safely on Slippery Volcanic Rock Steps?
The first “price” of an autonomous dive at Montaña Amarilla isn’t paid in euros, but in skill and caution. The entry point involves navigating a series of volcanic rock steps, often slick with algae and seawater. A slip here can end your dive before it begins. This is a critical moment where you are entirely your own safety officer. Commercial guides would manage this for you; the DIY diver must master it.
The key is not strength, but technique and proper gear. The most crucial piece of equipment for this entry is not your regulator, but your footwear. Sturdy, thick-soled neoprene dive boots are non-negotiable. They provide the necessary grip on the smooth, wet rock and protect your feet from sharp edges. Attempting this entry in thin-soled booties or, worse, barefoot, is inviting disaster. The boot is your first and most important point of contact with the challenging terrain.
As the image illustrates, the tactile grip between the boot’s sole and the wet volcanic surface is paramount. Your entire dive depends on this secure connection. Beyond gear, your movement must be deliberate. Use the “Rule of Three”: always maintain three points of contact with the rock (two feet and one hand, or a balanced athletic stance). Move slowly, letting the water take some of your weight between wave sets. Carry your fins in one hand, leaving the other free to balance. This is a dance with the ocean, not a brute force entry.
Renting Tanks vs Filling Your Own: Logistics for Independent Divers
Here we arrive at the heart of the sub-€20 dive: the air in your tank. For a packaged tourist, this is an invisible cost bundled into a €50-€70 guided dive. For the DIY diver, it’s the single most important line item to control. Your choice between renting a pre-filled tank and getting your own tank filled will determine whether your dive costs €20 or closer to €40.
Renting a full tank from a dive shop is convenient but more expensive. The true “system D” approach, and the only way to hit the sub-€20 target, is to have your own tank (or a long-term rental) and take it to a filling station. A standard air fill can cost as little as €5-€8. This is your magic number. However, this introduces what we call “logistical overhead.” You’ll need a car to get to the fill station and then to the dive site, adding costs for rental and fuel. You also need to factor in the time—a trip to the fill station can easily eat an hour of your day.
This is the classic DIY Diver’s Trade-Off: you exchange money for time and effort. The table below breaks down the real costs, revealing the hidden expenses that are crucial for accurate budgeting.
| Option | Cost Per Dive | Includes | Best For | Hidden Costs |
|---|---|---|---|---|
| Rent Tank (Pre-Filled) | €15-€25 | Full tank, insurance included in dive center price | Single dive, no transport | None – all-inclusive |
| Fill Station (Own/Rented Tank) | €5-€8 (fill only) | Air fill only | Multiple dives per day | + Car rental €30-50/day + Fuel €5-10 + Time (30-60 min drive) |
| Nitrox Fill | €8-€12 | Nitrox blend (typically 32%) | Advanced divers, deeper/longer dives | + Certification verification required |
The Risk of Tide Changes Trapping You on the Rocks After the Dive
If tank logistics are the primary financial challenge, the tide is the primary safety challenge at Montaña Amarilla. This isn’t just about a slightly more difficult exit; it’s about the very real risk of the tide rising and completely submerging your entry/exit point. This is the “Tidal Trap.” You finish your beautiful, hour-long dive only to surface and find the gentle steps you used to enter are now a churning wash of waves against a vertical rock face. You are effectively trapped.
This risk is significant. According to Tenerife tide prediction models, the area experiences a semi-diurnal pattern with a maximum tidal range of 2.5m (8.3ft) during spring tides. A 2.5-meter rise in water level is more than enough to make the standard exit impossible and extremely dangerous. A guided dive mitigates this because the guide’s job is to manage the schedule. As an independent diver, this responsibility falls squarely on your shoulders. You are your own tide master.
Ignoring the tide chart is the most common and dangerous mistake a DIY diver can make here. Your dive plan must be built around the tide, not the other way around. The golden rule is to plan your entry for low or mid-tide, ensuring you exit well before high tide peaks. The following checklist is not optional; it’s a mandatory part of your pre-dive procedure.
Your Pre-Dive Tide Safety Checklist
- Check Local Tide Tables: Consult official tide predictions for Santa Cruz de Tenerife before diving. Identify the exact time of high tide during your planned dive window.
- Calculate Your Surface Time: Work backward from high tide. If high tide is at 3 PM and you start diving at 1 PM, ensure your dive plan allows surfacing by 2:30 PM at the latest.
- Set Dive Computer Alarm: Program a secondary alarm on your dive computer 30-45 minutes before predicted high tide as a mandatory ascent reminder.
- Identify Visual Markers: Before entering, note specific rocks or formations at the current water level. If these are submerged upon exit, the tide has risen significantly.
- Plan Emergency Exit Route: Scout an alternative exit point higher up the coastline before the dive in case your primary entry/exit steps are submerged.
When to Dive Montaña Amarilla to Avoid Weekend Crowds?
Montaña Amarilla’s popularity is a double-edged sword. On a sunny Saturday afternoon, the entry point can resemble a busy public swimming pool, with guided groups, snorkelers, and sunbathers all vying for space. This not only diminishes the sense of tranquil exploration but can also be a safety concern, with finned traffic jams on the entry steps. The savvy DIY diver knows that the quality of the dive is as much about *when* you go as *where* you go.
The obvious advice is to avoid weekends, but we can be more strategic. Dive centers typically run their morning trips between 9 AM and 1 PM. This means that even on a weekday, the site can be busy. The real local’s secret, the golden window of opportunity, is the late afternoon, from 4 PM to 5 PM. By this time, the dive centers have packed up, the lunch crowds have dispersed, and the sun is beginning its descent, casting a beautiful golden light on the yellow mountain.
Diving during this “siesta window” often means you’ll have the entire underwater cathedral to yourself. The marine life is more relaxed, the light is magical, and the silence is profound. You trade the midday sun for solitude. This is the ultimate reward for the independent planner: not just a cheap dive, but a private one. Planning your dive for these off-peak hours transforms the experience from a crowded tourist attraction into a personal encounter with the Atlantic.
Why Boat Diving Accesses Superior Sites Compared to Shore Diving Here?
It’s a common assumption that boat dives are inherently “better” than shore dives. Boats can, after all, reach more remote walls, deeper wrecks, and spots known for attracting large pelagic species. So, by choosing a shore dive at Montaña Amarilla, are you settling for a second-rate experience? This is another critical trade-off the DIY diver must understand.
The answer is no—you are choosing a *different* kind of experience. While a boat dive might offer a higher chance of seeing large rays or schooling barracuda in the blue, Montaña Amarilla compensates with its own unique rewards. The site is a masterclass in macro life and intimate critter encounters. The volcanic arches and swim-throughs create a complex playground. The famous “Dinosaur Cemetery” at 8 meters is a geological marvel you can explore for minutes on end. Most notably, the site offers something many deeper boat dives cannot: interaction over observation.
Species Comparison: Boat Dive Sites vs Montaña Amarilla Shore Diving
Montaña Amarilla offers depths up to 20 meters with reliable sightings of rays, moray eels hiding under sand, and occasional angel sharks in deeper sections. The site features unique volcanic arches and distinctive rock formations. While boat dives to deeper sites may access larger pelagic species, Montaña Amarilla compensates with excellent macro life, turtles that frequently inhabit the reef, and fish species that actively follow divers—creating a different but equally rewarding diving experience focused on interaction rather than observation from a distance.
Supermarket vs Restaurant: Daily Food Costs in Tenerife South
The “system D” mindset doesn’t stop when you take off your BCD. A truly budget-conscious dive trip applies the same principles of strategic trade-offs to every expense, especially food. Eating out for three meals a day in tourist areas like Los Cristianos will quickly decimate your budget, easily adding €40-€50 per day to your costs. The autonomous diver, however, knows the local secrets to eating well for less.
Your primary strategy should be a combination of self-catering and exploiting a brilliant Spanish institution: the Menú del Día. By renting an apartment with a small kitchen, you can handle breakfast (coffee, fruit, yogurt) for a couple of euros. For your main meal, you hunt down a local restaurant in a non-tourist town like Las Galletas or Costa del Silencio and look for the magical sign. This three-course midday meal is the single best value-for-money food option on the island.
This strategy allows you to eat a huge, satisfying meal for lunch and then have a light, inexpensive dinner back at your apartment. This perfectly aligns with a dive schedule, too. A morning dive finishes just in time for you to head out for a Menú del Día. By adopting this approach, you can easily keep your daily food budget under €20, freeing up cash for what really matters: more dive tank fills.
- Target Local Restaurants: Look for ‘Menu del Día’ signs in Costa del Silencio, Las Galletas, and nearby towns—not in tourist-heavy areas.
- Lunch Timing (1-3 PM): The Menú del Día is a midday institution, typically offered only between 1 PM and 4 PM on weekdays.
- Expected Cost: €10-€15 for a complete 3-course meal including a drink, bread, and often coffee or dessert.
- What’s Included: A starter, a main course (meat, fish, or vegetarian), dessert or coffee, plus bread and one drink.
- Dive Schedule Adaptation: Plan your morning dive to finish by 1 PM, then head directly to lunch. This also aligns with the ‘siesta window’ when dive sites are least crowded.
Key Takeaways
- The sub-€20 dive is achieved via a €5-€8 air fill on your own tank; this is the core of the budget strategy.
- Mastering the “Tidal Trap” by planning your dive around the low-to-mid tide cycle is your most critical safety task.
- Embrace the DIY trade-offs: you swap the convenience and cost of dive centers for personal planning, logistical effort, and ultimate freedom.
Planning a Tenerife Dive Trip: How to Budget for a 1-Week Stay in High Season?
So, how does this all come together over a full week? Planning a budget dive trip is an exercise in adding up all the small, smart decisions you’ve made. It’s the culmination of the DIY philosophy, contrasting sharply with the all-inclusive, high-cost convenience of a dive center package. A package deal is simple: you pay a large sum upfront and let someone else worry about the details. The DIY approach is a mosaic of smaller, controlled costs.
The biggest difference lies in the cost of diving itself. Over 10 dives, a package might cost €500-€700. The DIY diver, owning their gear and just paying for air fills, could spend as little as €50-€80 on the same number of dives. This staggering difference is the financial engine of your trip. Of course, the DIY diver has other costs to consider, like car rental, which the package diver avoids. However, as the breakdown shows, the savings on the dives themselves more than compensate for these extra logistical expenses.
Ultimately, the choice comes down to your priorities. Do you value ease and simplicity above all else? The package is for you. But if you value autonomy, flexibility, and significant cost savings, the DIY path is unbeatable. The data from Tenerife dive centers is clear: while a guided package costs €50-€70 per dive, the cost for a DIY shore diver with their own gear can be close to zero, save for the air fill. The following table provides a clear comparison for a hypothetical 1-week, 10-dive trip.
| Expense Category | DIY Independent Diver | Dive Center Package | Savings (DIY) |
|---|---|---|---|
| Accommodation (7 nights) | €350 (apartment with kitchen) | €280 (shared room dive resort) | -€70 |
| 10 Shore Dives | €80-€150 (if renting tanks: 10 × €15, or €80 for 10 fills) | €500-€700 (10 × €50-70 guided) | €350-€620 |
| Equipment Rental | €0 (own gear) | €0 (included in package) | €0 |
| Food (7 days) | €140 (self-catering + Menu del Día strategy: €20/day) | €210 (restaurant meals: €30/day) | €70 |
| Car Rental | €200 (compact 7 days) | €0 (center provides transport) | -€200 |
| Hidden Costs | €50 (excess baggage for gear, fuel) | €50 (tips, extras) | €0 |
| TOTAL (7 days, 10 dives) | €820-€890 | €1,040-€1,240 | €220-€350 |
Now that you have the complete blueprint for a budget-friendly, autonomous dive adventure at Montaña Amarilla, the next step is yours. Check the tide tables, find a fill station, pack your gear, and go experience the unparalleled freedom of being your own dive master.